You don’t need to be a genius at motorcycle maintenance to know how necessary brake pads are. Every time you squeeze your right handlebar or press your right foot down, you can feel the difference they make. Motorcycle brakes are the most important part of your motorcycle, and brake pads play a large role in how they function. But just like every other motorcycle component, brake pads wear out over time. Whether you do it yourself or take your bike to a workshop, there comes a time when you need to change the brake pads on your motorcycle.
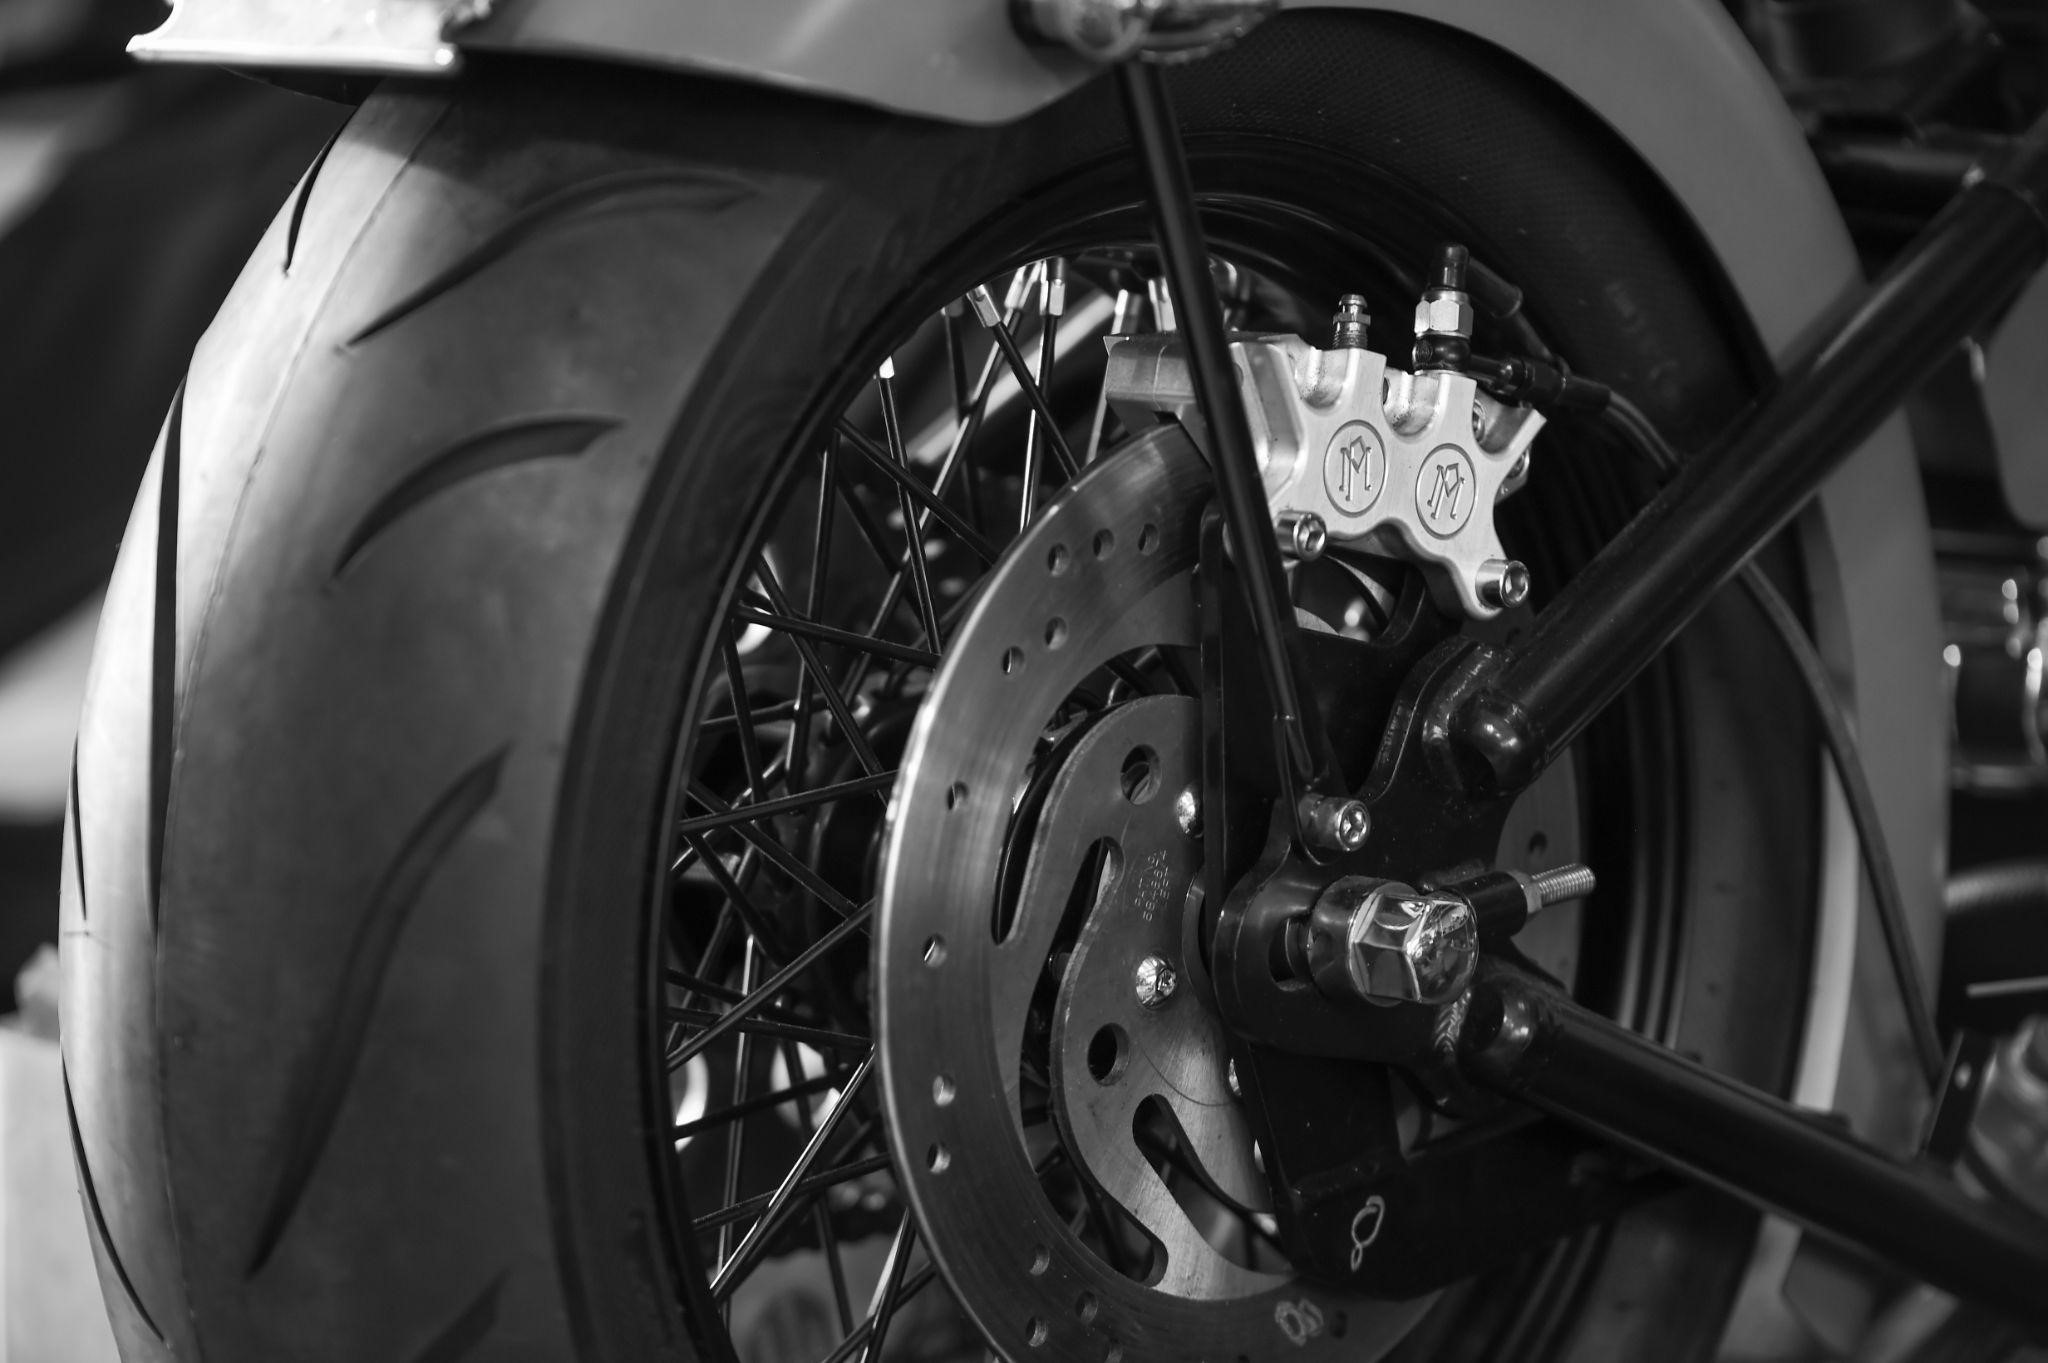
Brake pads are made of friction materials bonded to steel, and they play an important role in your motorcycle’s braking system. When you press the brake’s lever or pedal, its master cylinder sends hydraulic pressure to the callipers at the wheels. These callipers have pistons that are pushed against the metal backs of the brake pads, turning your bike’s kinetic energy into heat and bringing your bike to a stop when you need it.
Your brake pads have probably saved you from many nasty situations, but it’s easy to take them for granted until you have a problem. While your brakes are functioning perfectly, it’s easy to forget to check your motorcycle brake pads for signs of damage, wear and tear.
Fortunately, a little routine maintenance can help keep you safer on the road and motorcycle brake pad replacement isn’t hard to do. If you have some DIY skills, changing the brake pads on your motorcycle is a quick and easy task with the right tools. And if you don’t, there’s always the option of taking your bike to a motorcycle workshop.
Of course, being able to spot signs of trouble in advance always helps. Here is the Taverner Motorsports guide to how to check up on and change the brake pads on your motorcycle when necessary.
How to Check Your Motorcycle Brake Pads
If your motorcycle brake pads are wearing out, you’ll usually be able to hear some signs of trouble (more on that below). But if your brakes are making audible noises, driving on them is already risky. There are safer approaches to motorcycle brake pad replacement than waiting until you hear the squeals.
You might already be in the habit of checking your brake pads on a regular basis. But if you’re a newbie rider, here’s a simple way to do it. Read on to find out how to check your brake pads for beginners and when new ones are needed.
Many motorcycle models have disc brakes on both the front and rear ends, with two discs on the front. The position of each brake calliper is just over the disc. If you crouch down to wheel level and shine a flashlight on it, you should be able to see that each pad has two distinct layers: the one made out of friction material and the metal plate that backs it.
The friction material plate should be thicker than the metal one. If it’s a little thinner, you can leave it for a while, but you should continue to check it every week. If it gets below a couple of millimetres thick, the time to change the brake pads on your motorcycle has arrived.
When you know how to check your motorcycle brake pads, it helps you keep the more severe signs of brake pad damage at bay before they put you at risk.
Signs Your Motorcycle Brake Pads Need To Be Replaced
Sometimes you get a loud and clear sign that it’s time to change the brake pads on your motorcycle. If you experience any of the following, you should break out the tools (if you know how) or make an appointment with your motorcycle mechanic.
A squealing or grinding sound
Hearing a squealing or grinding noise when you’re riding is not only alarming, but it’s one of the clearest signs your motorcycle can possibly give you that your brake pads are wearing thin. The sound you’re hearing is the metal backing of the brake pad rubbing against the surface of your rotor. If you continue riding your motorbike in that state, it will cause further damage to your braking system and could put your life at risk as well.
Longer stopping distance
If you notice that it’s taking longer for your brake pads to come to a complete stop, this is a sign that your brake pads are on their way out – as well as a dangerous situation in itself. Taking a good look at your brakes immediately is crucial.
A spongy or soft brake lever
If your brake lever or calliper piston feels spongy or soft when you put pressure on it, this can indicate that it’s time for motorcycle brake pad replacement. Your brake pads may need to be replaced, or the issue might be with a hose or springs.
A lot of riders look at how many kilometres they have on the clock to see if they’re due for new brake pads. But how much you’ve ridden isn’t always a clear indicator of when you’ll need to change the brake pads on your motorcycle. It depends on other factors like how aggressive your riding style is, how fast you ride, and the condition of your rotors and brake pads themselves, among others.
You can count on one thing. If you ride your motorcycle for a long enough time, the day when you have to change the brake pads on your motorcycle will come. When it does, you need to either know how to change them or know someone who knows.
How to Replace Your Motorcycle Brake Pads
If you’re wondering how to change the brake pads on your motorcycle, we have some great news for you. The task is fairly easy to accomplish, and you don’t need a lot of special skills. Here’s our step-by-step guide to motorcycle brake pad replacement.
Remove your callipers
While this step is technically optional, taking your callipers off lets you take a closer look at all of your brake’s components. There should be two bolts holding the callipers to the front fork assembly to remove first.
Clean your brakes
Use a toothbrush and some brake cleaner to scrub the gunk off the brake components, check the state of the seals and keep an eye out for rust. Before you pull out the clips or retaining pins is the best time to clean around the area where the brake sits in the calliper. After removing the pins, you can clean more of the inner surfaces of the calliper.
Remove the retaining pins
If your bike has split pins securing the retaining pins, you can use pointy-nose pliers on them.
Remove the brake pads
This is a good time to finish cleaning more of the inner workings of the calliper.
Put the pistons back in
Check the fluid level, then carefully push the pistons back into the calliper body.
Dress the rotor
Use a pad and brake cleaner to make sure the new pads have a clean surface to fit right at home.
Install the new brake pads
This is a good time to bleed your brakes in order to remove any air bubbles.
Maintenance and Servicing at Taverner Motorsports
Book your motorcycle in for a major service with Taverner Motorsports, and we’ll make sure it’s always in top condition. Our full-service option involves examining your entire motorcycle to make sure it’s in prime condition, including checking your motorcycle brake pads and flushing the front and rear brake fluid. While we focus on making sure your motorbike runs as well as possible, we also pay close attention to its physical condition and treat any surface blemishes.
If you need more detailed repair work, our skilled mechanics can diagnose and fix a range of issues, from brake repairs to electrical system troubleshooting. If you need genuine or aftermarket replacement parts, we have options available from some of the world’s leading brands and manufacturers.
For more information about Taverner’s major servicing, repair work and motorcycle maintenance, contact the Taverner team for a free quote.